Installation
Video Guide
If you would prefer a video guide walking through installing the launcher (or SteamDeck plugin) and game on every platform we currently support, check out this
Otherwise the following describes the same steps with text, which may elaborate on certain sections more than the video does.
Opening notes
Please note that help and support for this project is not always available, as everyone involved is donating their time to this project for free. If this page or the FAQs can't answer your question, you might be able to find help in the OpenGOAL discord, but we do not guarantee support.
At the moment OpenGOAL only supports running the first three Jak and Daxter games. This is an open source passion project, and you're more than welcome to contribute to their development with us! See Contributing and Developing for more information.
Additionally, if you'd like to see a video copy of this installation, there is a guide available on YouTube that you can follow along with.
There are 3 main steps required to set up OpenGOAL on your machine, which are:
- Creating your
.isofile containing (these contain the official Jak and Daxter assets) - Installing OpenGOAL
- Running the OpenGOAL setup
Once these steps are complete you'll be able to run Jak and Daxter within OpenGOAL, and see everything this project has to offer. Follow the instructions below to prepare your installation and start playing!
Requirements
These are the minimum requirements for the project at the time of writing:
- An operating system that we support
- Windows 10 / 11
- A Linux distro that is still atleast in LTS (we build with Ubuntu 20.04)
- An Intel Mac running atleast BigSur
- x86-64 CPU with AVX support.
- Most, if not all, 64-bit CPUs should work. OpenGOAL has a very small CPU footprint, so most modern CPUs will run the game fine.
- Graphics card that supports OpenGL 4.3 (or OpenGL 4.1 in the case of macOS).
- If you have an AMD Radeon card, updating your AMD drivers to at least version 22.7.1 is recommended. Older driver versions or other AMD cards will be running at a disadvantage.
- At least 2 GiB of available RAM for the game is recommended.
- You might experience slower loads with a hard drive compared to an SSD.
Windows Specific
We only support Windows 10, and Windows 11.
- Windows 7 has been out of support since January 2020
- Windows 8.1 will be end of life January 2023
You may need to install the latest 64-bit C++ redistribution.
Linux Specific
Nothing additional should be required other than functional GPU drivers
Step 1: Preparing your ISO
The first major step requires a legal copy of any retail version of Jak and Daxter (early builds and demos not supported), as well as a CD drive to read it. We will be using these to create a .iso file, which contains all of the assets (such as the 3d models and sound files) that are stored on the PS2 disc, and are needed to run OpenGOAL.
You will need your own legitimately obtained copy of the original game. The Jak games are not rare and can be found used for very affordable prices at a variety of second-hand and online stores.
Example Jak and Daxter listing (THIS IS NOT AN ENDORSEMENT).
This guide will include one example of how to do this using ImgBurn, but any software that reads your disc will likely be able to do this. More information about this process and some alternatives can be found in the PCSX2 guide.
The first step is to download ImgBurn and install, which is hosted by a number of mirrors listed on the ImgBurn website.
We do not provide support for ImgBurn directly, but there are many documents about this on the ImgBurn site and across the web. With any luck you won't need to troubleshoot the install, it's generally very stable.
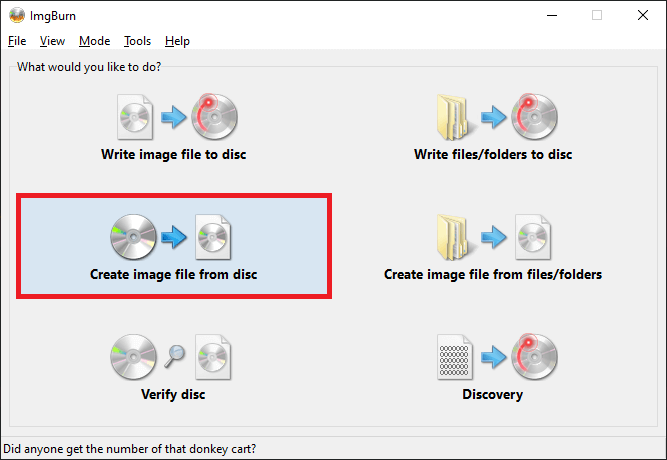
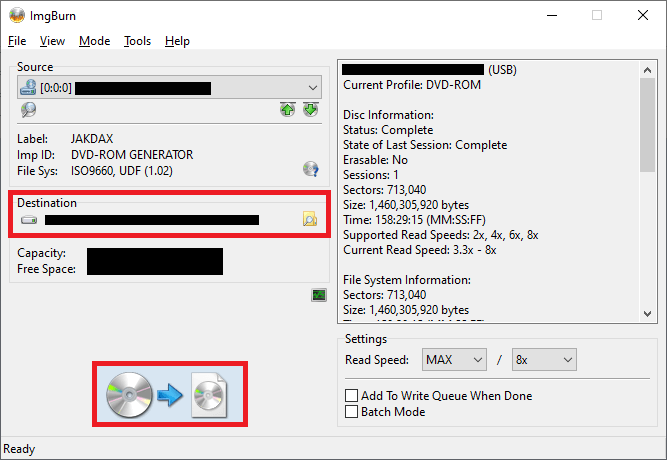
Once it is installed, you'll need to insert your Jak and Daxter CD into your CD drive, and let ImgBurn read it. On the opening screen, this can be done with the Create image file from disc command, followed by choosing a location to save your .iso and starting the read. Some images of this process are included below.
Expand this section to see step by step ImgBurn screenshots


This process will take a few minutes, so leave it running while we continue on with the next step: installing OpenGOAL itself.
If you are on a SteamDeck, you will likely need to use the compiled releases, instead of the Launcher. See Step 2b below!
Step 2a: Installing via the Launcher
The launcher is the preferred way of getting and using OpenGOAL:
- You can easily update both the launcher and the game
- Designed for non-technical users
- More useful features in the future
Launcher Pre-requisites
There are a few requirements depending on your platform that you may need to handle.
Windows
The Launcher depends on WebView2, which has been shipping on Windows 10+ since April 2018. If for some reason you still don't have it and have been keeping your PC up to date, you can explicitly download it here https://developer.microsoft.com/en-us/microsoft-edge/webview2/
Linux
The Launcher is distributed as an AppImage, in recent distributions such as Ubuntu 22.04, you may see an error like the following:
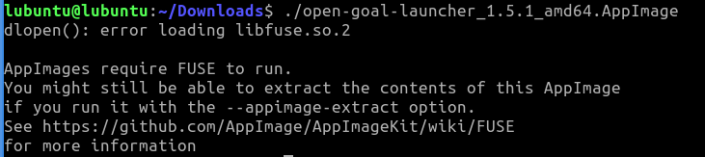
If so, install the following package
sudo apt install libfuse2
MacOS
Beware that while OpenGOAL currently runs on Apple Silicon devices, it depends on Rosetta, and there are known performance issues as a result of this.
The Launcher is distributed as a .dmg and can be installed like any other common MacOS Application.
Downloading and Installing
The latest release of the Launcher can be found using the link below.
Windows Defender Warnings
The installer however is not signed, which may lead to warnings from Microsoft Defender or your antivirus of choice, as installing unsigned applications can be a security risk. This is unfortunately something we can not fix, as signing an application is both expensive and time consuming, and this project is being developed free of charge by a community of volunteers.
If you trust this application even without the signature, some screenshots of how to pass through the most common warnings can be found below. If you have some technical experience, and would prefer to build this application from the source yourself to avoid these errors, then take a look at the project README instructions instead. Support for this however is outside the scope of this document.
Expand this section to see examples warnings and ignore them (if you trust this application!)


If you have chosen to continue installing the application after these warnings, you'll be shown a simple installation wizard that will allow you to configure and launch OpenGOAL. Some step by step screenshots have been included below.
Expand this section to see the process of installing the launcher (on Windows)


If you choose to launch OpenGOAL once the install is completed, you'll skip right to the next step. If not you'll need to navigate to the location you chose for OpenGOAL to install (by default this location is C:\Program Files\OpenGOAL-Launcher), and run OpenGOAL-Launcher.exe.
If this opens successfully, you've reached the final stage! Up next we'll be setting up the launcher, including extracting the assets from your .iso file.
SteamDeck Setup
On the SteamDeck, there are some steps you'll likely need to take before you can successfully launch the launcher. The following steps are all done in desktop mode.
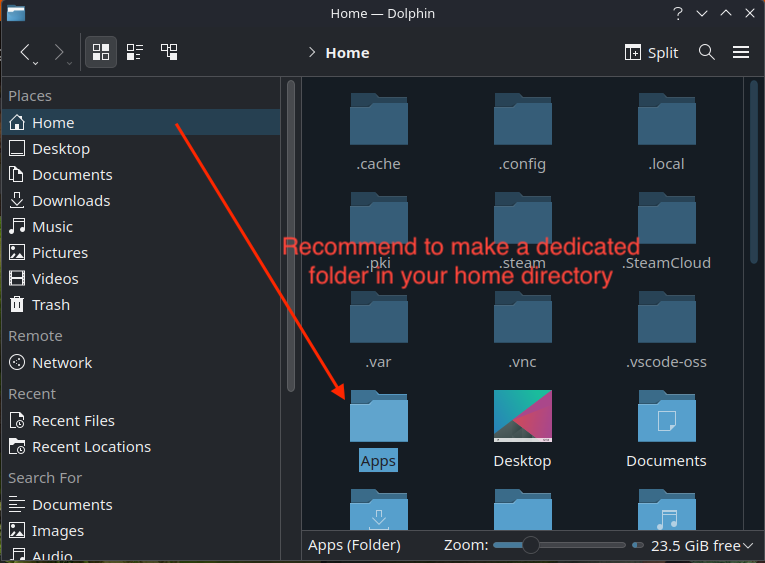
First after downloading it, you should move it to a directory in your HOME directory so it is not lost between SteamOS updates. Here I've created an Apps folder, and cut and pasted the file there.
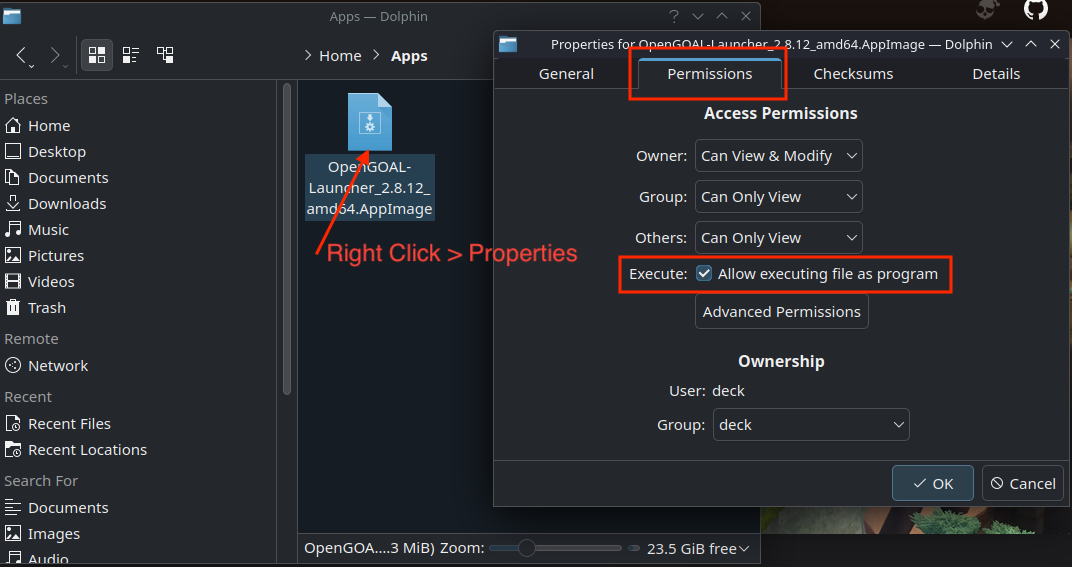
Next, you'll need to ensure it has execute permissions:
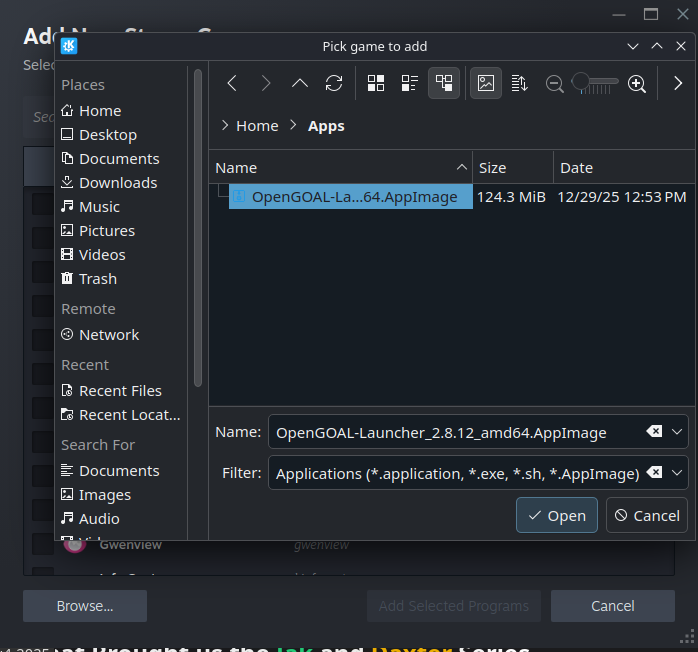
Finally, you'll want to add the launcher to Steam, as a non-steam game. This allows you to launch it from Game Mode.

Using the Launcher
In recent versions of the Launcher there is no longer a set jak-project release. You are free to download or roll-back to any official or unofficial release.
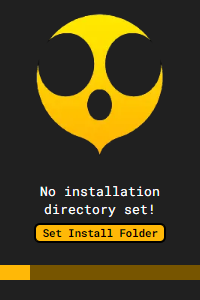
If it is your first time using the launcher, you will be prompted to select an installation directory. This is the folder where all of the following will go:
jak-projectversion releases you download- extracted ISO contents
- the built game files
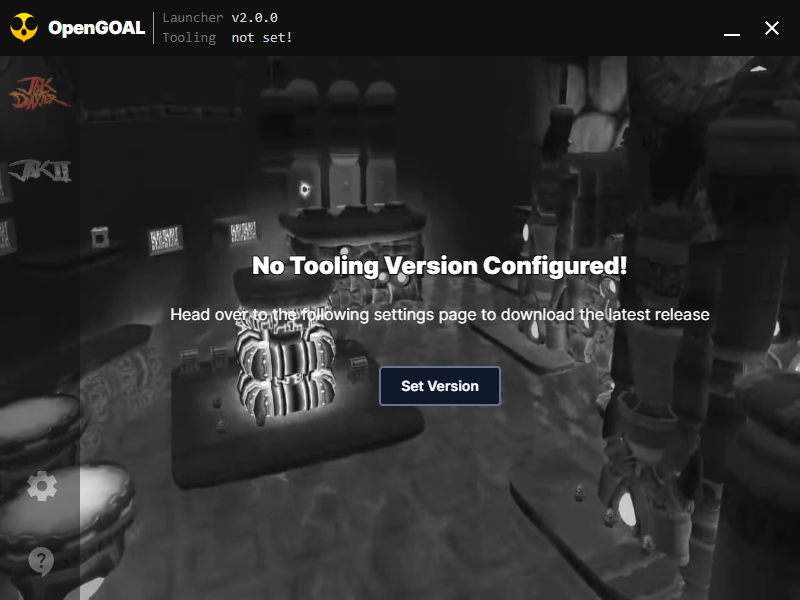
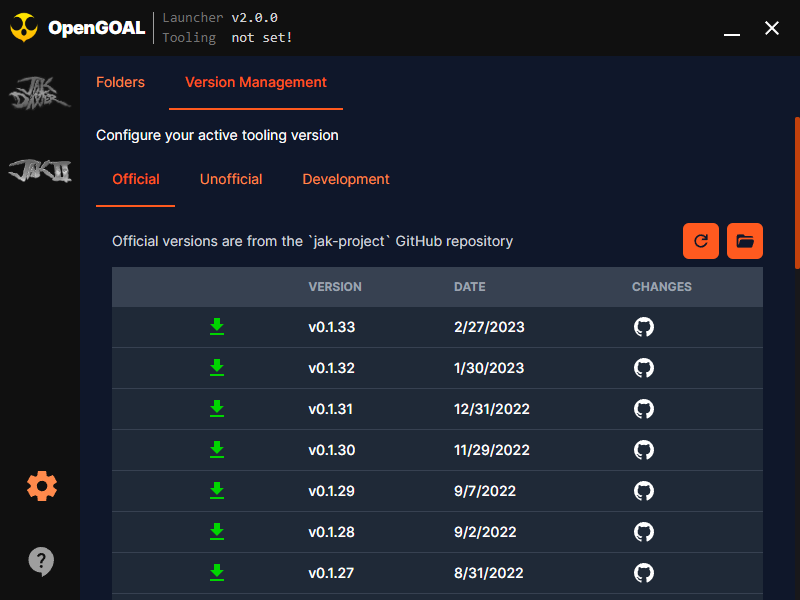
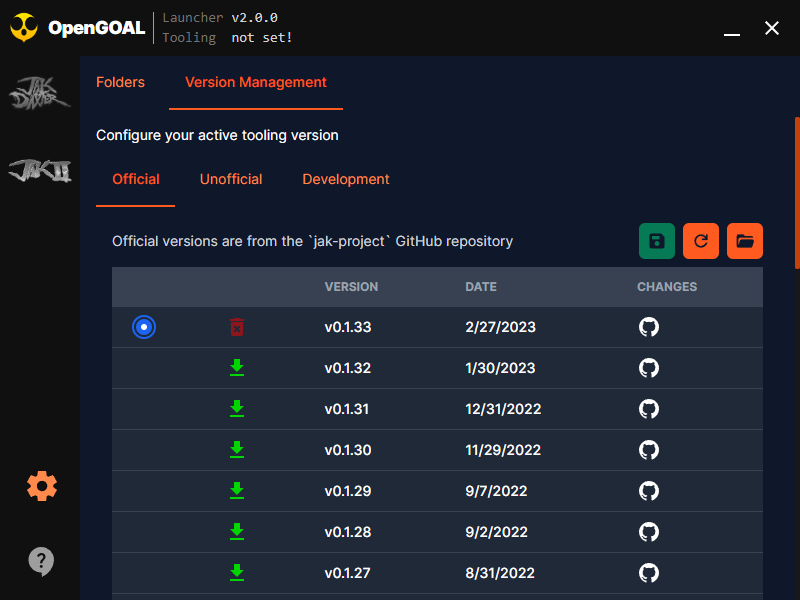
When the launcher loads, you will not have a tooling version downloaded. In regards to official versions, these correspond to the releases that can be found here
To select one (likely the latest) follow the prompt.
Click the download button on the latest version, then select it, and save your changes. This is where you could rollback to a previous version, if for example, we release a breaking bug.
With this you can now go back to the respective game menu and install it.
Before the installation takes place, the Launcher will check that you meet the minimum requirements.
If you don't, you unfortunately WILL NOT be able to continue with the installation. OpenGOAL requires a minimum OpenGL version from your GPU as well as AVX support from your CPU, and if either of those requirements aren't met you WILL NOT be able to run OpenGOAL.

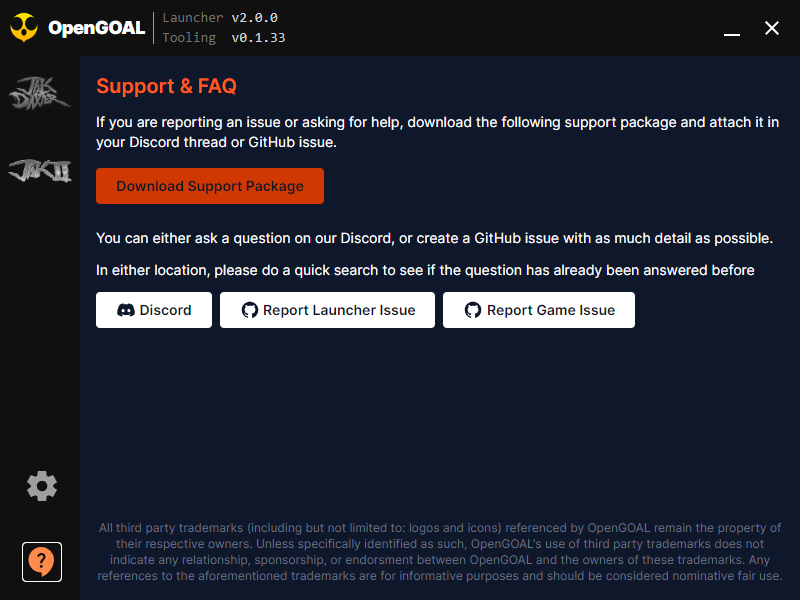
If at any point during the installation something goes wrong and you are going to ask for help or report an issue. Download the Support Package in order to easily give the person helping you everything they could ask for all at once.
There is a button to download this in the help page, as well as one should appear on the installation page if it fails.
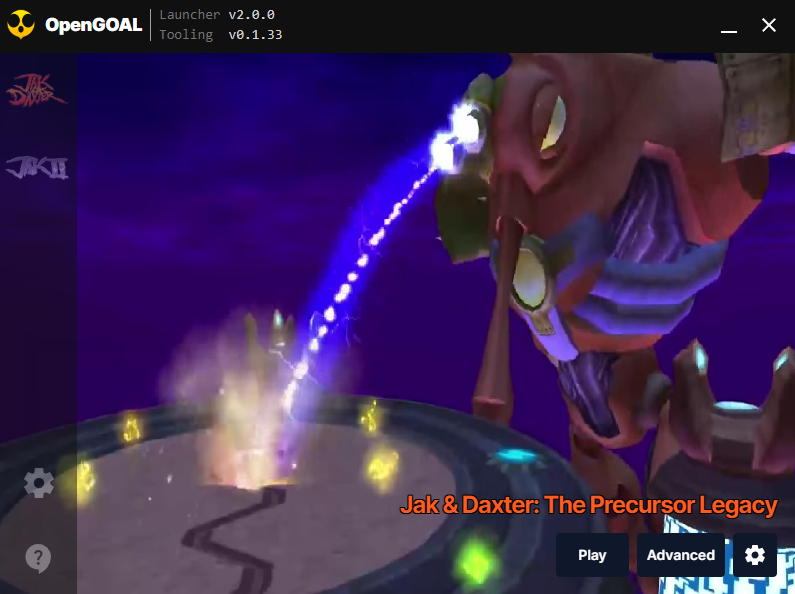
Once you've reached this screen, you're all set up and ready to go! Just hit PLAY to start the game. The other controls are not something you'll need to play the game, as most of them are tools for developers, or helpful links to folders such as your save files.
That's everything! At this point you should have a working copy of the game to play. Join us in the discord or find streams/stream yourself on Twitch to get involved in the community.
ENJOY!
Setting up a Steam Shortcut
If you would like to be able to launch the game without having to go through the launcher, which is especially useful on platforms like the SteamDeck, do the following:
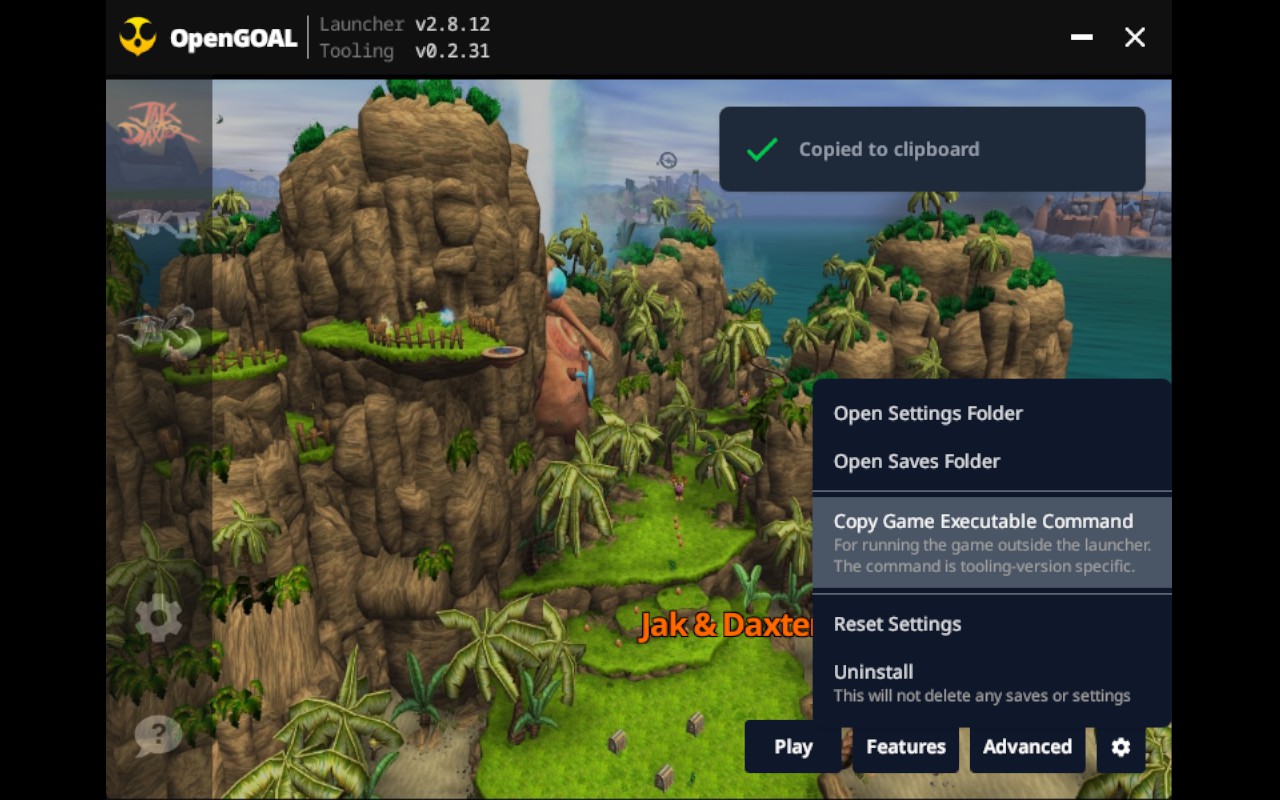
First click on the "Copy Game Executable Command" button on the relevant game page:
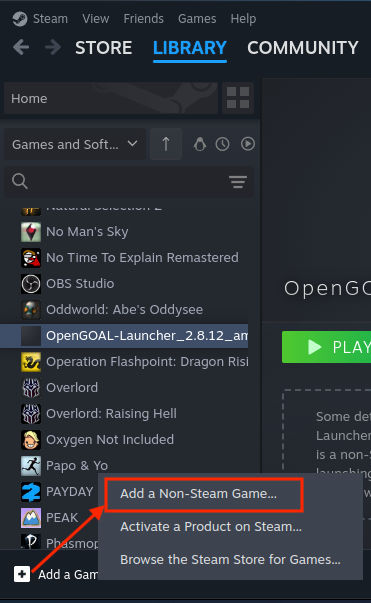
Then, inside steam you'll want to add a new non-steam game:
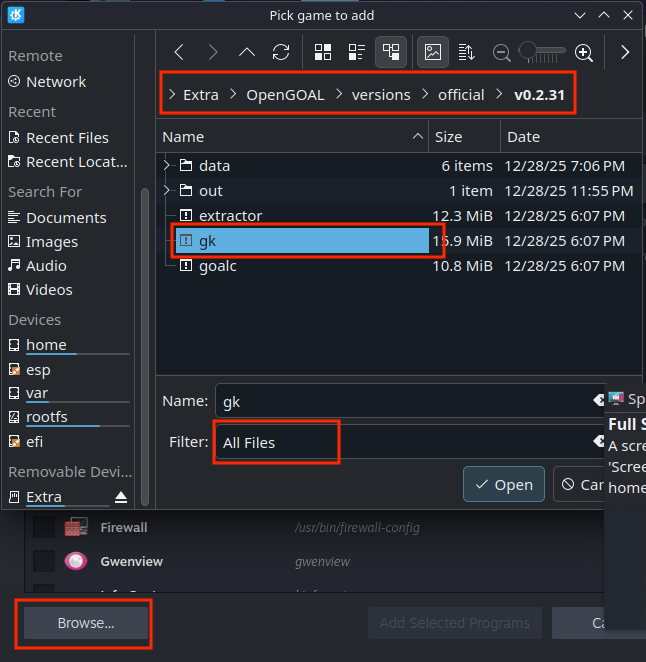
We'll need to find the gk[.exe] executable for the version you want to run. If you are using the launcher, this will be in your installation directory under the versions folder.
Two things to note here:
- When you change versions, this shortcut will have to be manually updated accordingly
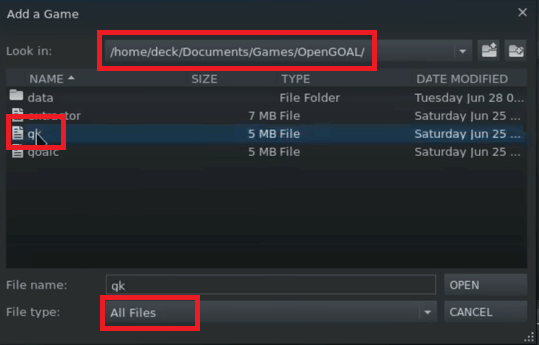
- Atleast on linux, you have to switch to "All Files" to see
gk
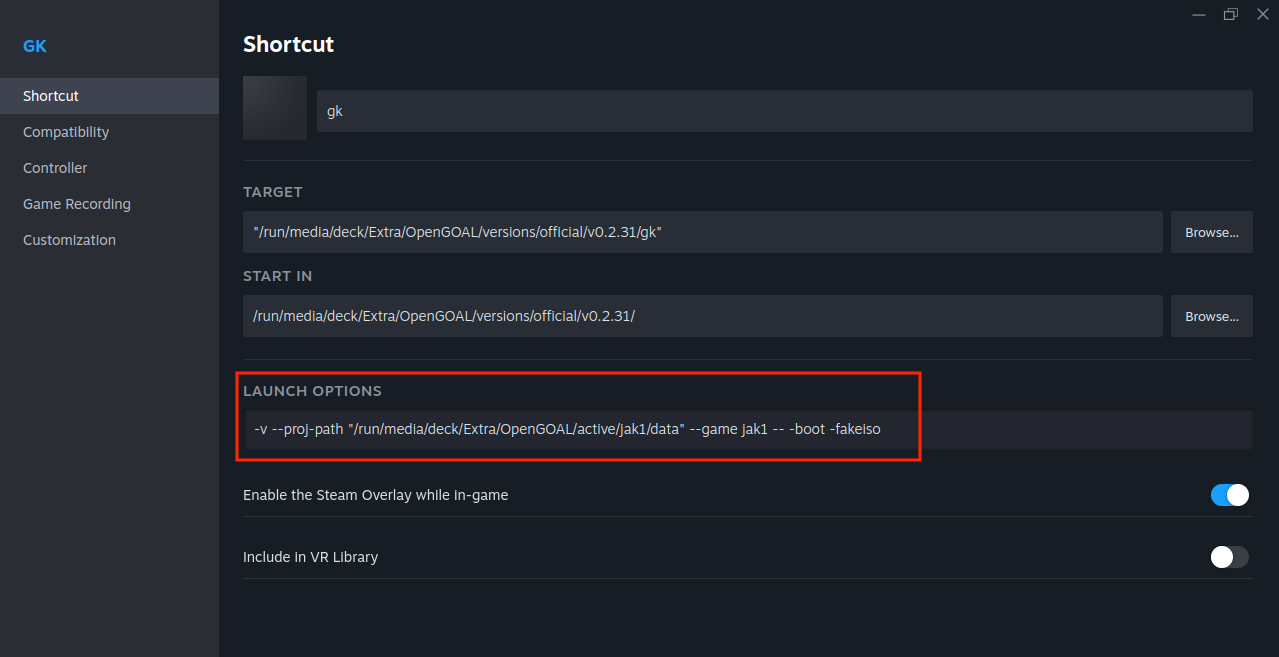
Now we can open the shortcut's properties to paste in the command the launcher provided us into the Launch Options input
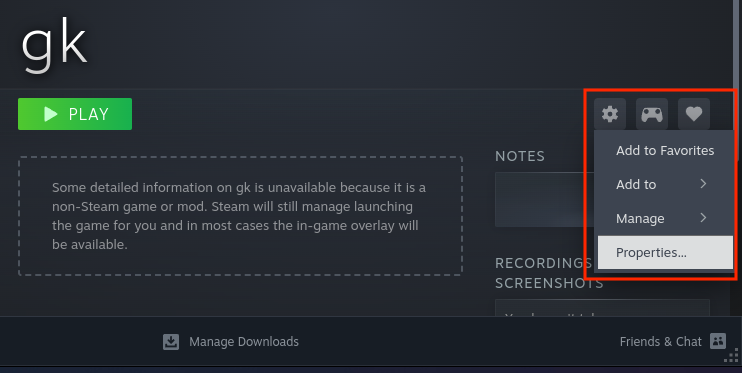

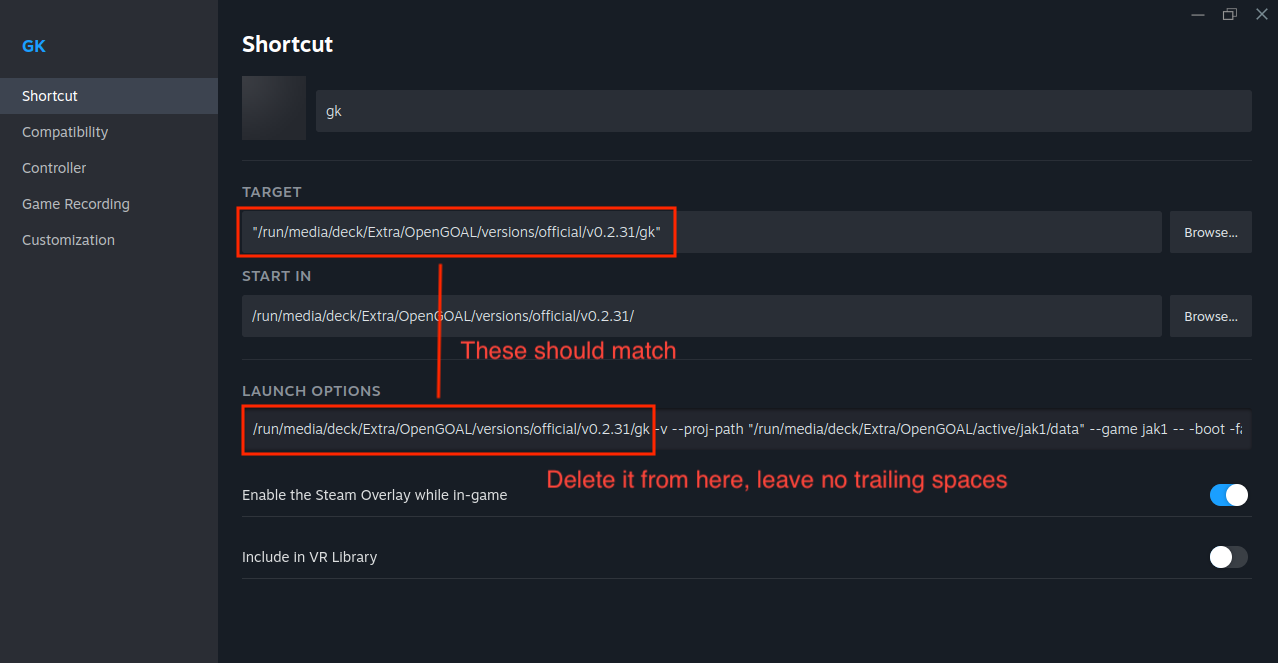
Note that the beginning part of the pasted command should match the Target, we will delete this part of what we pasted, leaving only the arguments.
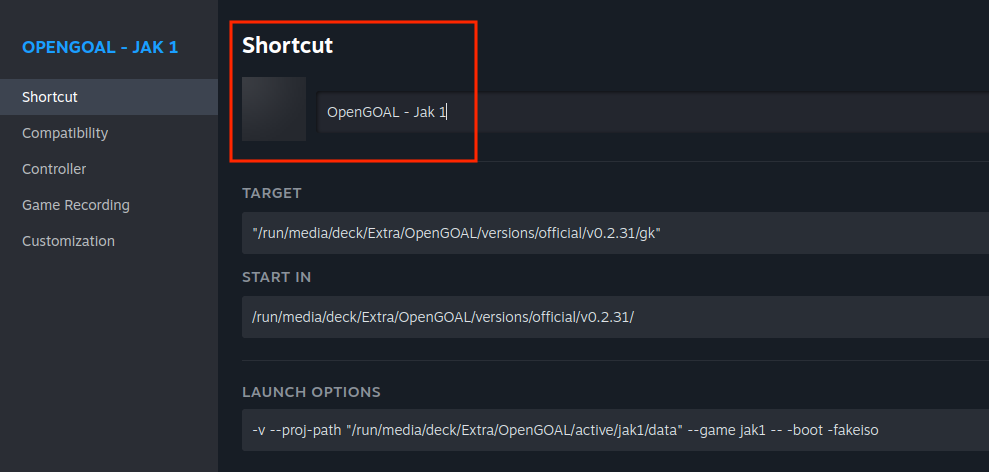
Wrapping up, we can change the name:
If you want to customize the look of the game's shortcut (the cover-art, thumbnail, etc) you can do so via the Customize menu:

Check out SteamGridDB for assets or ideas
Step 2b: Installing via a jak-project Release
If you don't want to use the Launcher or it is not applicable for your platform, you can use the minimal base release instead.
These releases can be found here - https://github.com/open-goal/jak-project/releases
- For Windows you want to download the
opengoal-windows-vX.X.X.zipasset - For Linux you want to download the
opengoal-linux-vX.X.X.tar.gzasset - For MacOS (Intel only) you want to download the
opengoal-macos-intel-vX.X.X.tar.gzasset
If you have some technical experience, and would prefer to build this application from the source yourself, then take a look at the project README instructions instead. Support for this however is outside the scope of this document.
Windows
If you would prefer a video, there is an old tutorial here, but it only covers installing/playing Jak 1.
- Extract the
.zipfile wherever you'd like - From Powershell/Command Prompt run
./extractor.exe --game jak1 <path-to-iso>(swapjak1forjak2/jak3if you're trying to install those games) - Run
gk.exeto open the gamegkdefaults to booting Jak 1. If you're trying to play Jak 2 or 3, you'll need to open Powershell/Command Prompt and run./gk.exe --game jak2or./gk.exe --game jak3.
Linux
If you're continuing with the builds from the latest releases, extract the contents of the .tar.gz file to get a folder with a similar list of files to the below.

Once you have these files extracted, there are two main steps required.
- Extract all of the assets from the
.isofile you created earlier, using theextractorfrom the install above (e.g../extractor --game jak1 <path-to-iso>, swappingjak1forjak2/jak3if you're trying to install those games) - Once the extraction completes, you should be able to run
gkfrom the same folder to start the gamegkdefaults to booting Jak 1. If you're trying to play Jak 2 or 3, you'll need to open a terminal and run./gk --game jak2or./gk --game jak3.
Linux (Steam Deck)
Similar to the previous section, you can manually install OpenGOAL on a SteamDeck
This is a video guide for Steam Deck users that covers the process of installing and running OpenGOAL very thoroughly. The only change in this video is that we do now support other non black label versions of Jak and Daxter, so any disc should work!
NOTE: For Steam Deck users, you can add OpenGOAL to your Steam library after installation by pointing to the
gkfile in this folder. You will need to change theFile typetoAll Filesin order to see it!
A simple shortcut like this will only work for launching Jak 1, you will need to specify the arguments as described in the previous Linux section for Jak 2 and beyond.
MacOS
Beware that while OpenGOAL currently runs on Apple Silicon devices, it depends on Rosetta, and there are known performance issues as a result of this.
The process of using a jak-project release on an Intel based Mac should follow the same steps mentioned above for Linux. Just be sure you download the appropriate macos asset from the release.
Conclusion
That's everything! At this point you should have a working copy of the game to play. Join us in the discord or find streams/stream yourself on Twitch to get involved in the community.